C&N Footlockers
Trunk Repairs Made Easy
C&N trunks are built for years of camp, travel, and everyday use.
If a piece of hardware gets damaged along the way, most repairs are quick,
simple, and can be handled right at home.
How Repairs Work
Part Diagrams
Replacement Parts
Can't Find It?
Fix Your Trunk in Three Steps
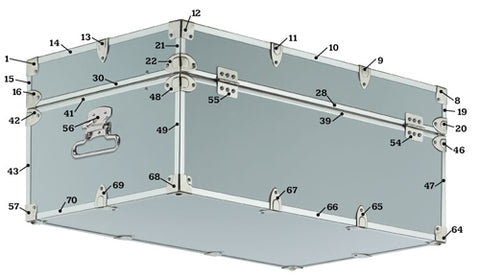
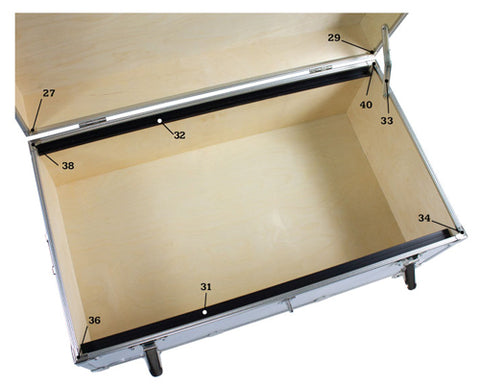
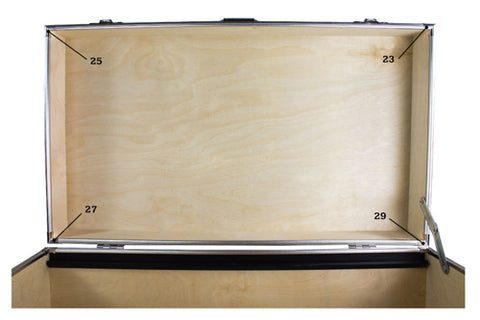
Start with the diagrams below to identify the damaged part.
Then open the matching replacement-part page for details and installation instructions.
1
Find the Number
Locate the damaged hardware on one of the numbered trunk diagrams.
2
Find the Part
Search the replacement-parts list by part name or diagram number.
3
Make the Repair
Open the part page for installation instructions, then get your trunk back in action.
C&N replacement parts are provided at no charge. You pay only for shipping.
Replacement Parts
You only need to find the part once. Numbers that use the same replacement part are grouped together below.
Lid & Upper Trunk Parts
Lid Corner Protector
Diagram #1, 5, 8, 12
View Part & Instructions →
Lid Front Trim
Diagram #3
View Part & Instructions →
Lid Side Trim
Diagram #6, 14
View Part & Instructions →
Lid Back Trim
Diagram #10
View Part & Instructions →
Lid Vertical Trim
Diagram #15, 17, 19, 21
View Part & Instructions →
Lid Tongue Corner Clip
Diagram #23, 25, 27, 29
View Part & Instructions →
Lid Tongue Front
Diagram #24
View Part & Instructions →
Lid Tongue Side
Diagram #26, 30
View Part & Instructions →
Lid Tongue Back
Diagram #28
View Part & Instructions →
Lid Stay
Diagram #33
View Part & Instructions →
Hardware
Clamp
Diagram #2, 4, 7, 9, 11, 13, 58, 60, 63, 65, 67, 69
View Part & Instructions →
Trim Bracket
Diagram #16, 18, 20, 22, 42, 44, 46, 48
View Part & Instructions →
Latch
Diagram #50, 52
View Part & Instructions →
Center Latch with Handle
Diagram #51
View Part & Instructions →
Handle
Diagram #53, 56
View Part & Instructions →
Hinge
Diagram #54, 55
View Part & Instructions →
Base & Lower Trunk Parts
Base Groove Corner Clip
Diagram #34, 36, 38, 40
View Part & Instructions →
Base Groove Front
Diagram #35
View Part & Instructions →
Base Groove Side
Diagram #37, 41
View Part & Instructions →
Base Groove Back
Diagram #39
View Part & Instructions →
Base Vertical Trim
Diagram #43, 45, 47, 49
View Part & Instructions →
Base Corner Protector with Bump
Diagram #57, 61, 64, 68
View Part & Instructions →
Base Front Trim
Diagram #59
View Part & Instructions →
Base Side Trim
Diagram #62, 70
View Part & Instructions →
Base Back Trim
Diagram #66
View Part & Instructions →
Interior & Miscellaneous Parts
No matching part found. Try another term or send us a photo below.
Not Sure Which Part You Need?
Send us a few clear photos of the damaged area and our team will help identify
the replacement part. Include one close-up of the damage and one wider photo
showing where the part sits on the trunk.